An announcement list (or newsletter, or one-way list) is often be the best way of sending information or updates to a large number of recipients, such as a membership list. Use of a contact list in an email client such as Outlook is not a good solution as you may run into issues with bounced messages, limits on the number of senders your ISP allows etc. A Mailman list solves these problems and will also allow more than one person to manage the list.
In this setup, an administrator will add new members and they will be sent a welcome message that does not mention how to post to the list (since it’s a one-way list). They will receive your newsletters, with a footer that gives simple instructions for unsubscribing. Only authorized persons will be able to post to the list (e.g. send announcements or newsletters) using a password to prevent address spoofing and spam.
These instructions apply to Mailman version 2.1.7 and above supplied in cPanel, other installations will be similar (follow from Basic List Setup instructions).
Before You Start
In order to complete the setup, it’s a good idea to first check:
- You have a good name for list (it will be used to form the email address);
- That your hosting account admin address will receive emails, or you have another address prepared for this;
- If the administration is shared by several people, whether they need to see each others’ posts;
- Whether you need to have specific welcome or leaving text or web links;
Create a new Mailing List
Login to your hosting control panel, then click the Mailing Lists item in the Mail menu
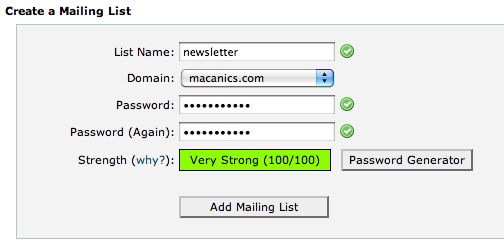
Fill in the details to create your list:
- Choose a unique (and descriptive) list name, as this will also be used as the email address for the list.
- Choose a strong password (it will be protecting potentially sensitive data – your membership list); store the password safely, it will be used to access the list management pages.
Click Add Mailing List
The list is created, now click the Go Back button to return to the Mailing Lists page.
Select the List
In the Current Lists section, find the entry for your list and click the Modify link.
A new Newsletter Administrator Authentication window opens; enter the list password and click Let me in…
Once the management page is loaded, you may wish to save or note down the URL for later use without going through your hosting control panel.
Basic List Setup
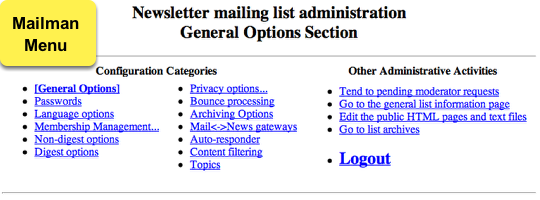
Set up the following items in the General Options page. There are a lot of settings on this page, but you can ignore those not listed below.
- List administrator email addresses: by default this is set to the default site email address. Change this address to whoever is going to be running the list, make sure it’s a working address! You can have more than one administrator listed here.
- List moderator email addresses: enter addresses here if someone other than the administrator will be authorised to send messages to the list.
- Set the terse phrase to something short and snappy, e.g. "Book Club Members"
- Set the Prefix for subject line so that your list emails will be easily identified by it’s members, e.g. "[Book Club]". This text will be put at the start of each email subject line.
- Set Hide the sender of a message to Yes
- Set Send monthly password reminders to No
- Set Should postings include the List-Post: header? to No
Optional: Set Should administrator get notices of subscribes and unsubscribes? to Yes if the administrator needs to track members unsubscribing themselves, so that membership records elsewhere can be updated for instance.
Now click Submit Your Changes at the bottom of the page
Basic Security Settings
The list, it’s membership roster and all posts to it are potentially accessible from the web by default, including the possibility of it being indexed by search engines such as Google. Therefore you should enable security for the membership list as follows:
Click on Privacy Options…
- Set Advertise this list when people ask what lists are on this machine? to No if you want to hide the list and it’s archives (if present) from casual web searches.
- Set What steps are required for subscription? to Require approval if you want to stop people auto-subscribing to your list by email.
Scroll down to Membership Exposure
- Set Who can view subscription list? to List admin only
Click Submit Your Changes
Next click on Archiving Options
- Set Archive messages? to No if you don’t want to keep copies of emails sent by the list
- Set Is archive file source for public or private archival? to private
Click on Submit Your Changes to finish the basic setup.
Optional (but recommended!) – Modify the Joining and Leaving Messages
On the General Options page, scroll down to Notifications and change the following:
List-specific text prepended to new-subscriber welcome message: Set this to some text that introduces the list, and describes why the user is subscribed, e.g.
- You have been subscribed to the Book Club newsletter mailing list – all new members automatically join this list. We will use it to send you occasional newsletters and notices about the club to keep you up to date with our activities. If you do not wish to remain on this list, please follow the instructions below.
Send welcome message to newly subscribed members: set to Yes
Text sent to people leaving the list: Choose some text that explains why the user is unsubscribed, and who to contact in future, e.g.
- You have now left the Book Club members newsletter list, and you will no longer receive any mailings or notifications about the club. Sorry to see you go! You will still receive separate email reminders about your club membership, however. You can reach the club secretary if you have any queries at the following email address: secretary@thebookclub.com
Send goodbye message to members when they are unsubscribed?: set to Yes
At the bottom of the page click Submit Your Changes
Next, under Other Administrative Activities in the top menu, click on Edit the public HTML pages and text files
Now click Welcome email text file
Replace the current contents (which will contain links to list tools inappropriate for an announcement list) with something like the following:
Welcome to the %(real_name)s@%(host_name)s mailing list.

%(welcome)s

If you ever wish to unsubscribe from the %(real_name)s mailing list, you can do so via email
by sending a blank message to:
%(real_name)s-unsubscribe@%(host_name)s
You will receive an email asking you to confirm your request, replying to that email will
unsubscribe you.
Click on Submit Changes to save this setting.
You have now finished personalising the messages that members will receive.
Settings for Message Delivery
It is good practice to always give list management information to your users with every message. You should do this via a custom footer setting. The default message gives too much information for newsletter use, so you should change it to contain, as a minimum, the unsubscribe email address.
From the top menu click on Non-digest options
Change the text in the Footer added to mail box to the following:
_______________________________________________
%(real_name)s mailing list
To unsubscribe, please send a blank email to %(real_name)s-unsubscribe@%(host_name)s
To request help, please email %(real_name)s-owner@%(host_name)s
Now click Submit Your Changes
Next, click Digest options in the top menu
Change Can list members choose to receive list traffic bunched in digests? to No
Click Submit Your Changes
Setting Posting Authorisation
An announcement list, newsletter or other one-way mailing list should not allow it’s members to post or reply to the list. Only a few users (the administrator and moderators) should be able to post.
- Click on Privacy options… and then Sender filters in the top menu.
- Set By default, should new list member postings be moderated? to Yes
- Set Action to take when a moderated member posts to the list to Reject
- Set the text for the rejection notice to explain why users can’t post, e.g.
- This is an announcement-only list used to send newsletters and notices to club members. To contact us please email secretary@thebookclub.com
- Set Action to take for postings from non-members for which no explicit action is defined to Discard (Or Reject if you want to include a rejection notice as above)
Now click Submit Your Changes
The email addresses of authorised posters (normally the list administrators and/or list moderators) need to be added in one of two locations, depending on whether they need to receive copies of posts to the list or not. It may be useful to receive emails if posting to the list is shared by several people, for instance.
If copies of the list messages are not required:
- On the current page, set List of non-member addresses whose postings will be immediately held for moderation to the email addresses required, one per line.
- Click Submit Your Changes
If copies of the list messages are required:
- Make sure the list administrators and/or list moderator email addresses are added to the membership list (see Adding Members to the List below)
If there are already some members subscribed to the list, carry out the following:
- On the top menu, click Membership Management… and scroll down to Additional Member Tasks
- Make sure Set everyone’s moderation bit is set to On, then click the Set button
Posting to the mailing list is now restricted to the list administrator or a moderator using an approval password (see How to Post to an Announce-Only List below).
Optional: Set a Reply-To: Address
Should any member reply to an email from the list, they will receive the rejection notice that was set up above. Since some users will inevitably use Reply when sending an enquiry (rather than using the link provided in the footer) you may wish to have these replies sent to a separate email address. To do this:
- Go to the General options page and scroll down to Reply-To: header munging.
- Set Should any existing Reply-To: header found in the original message be stripped? to Yes
- Set Where are replies to list messages directed? to Explicit Address
- Set Explicit Reply-To: header to the email address you require (e.g. secretary@thebookclub.com)
If your newsletters are likely to be widely forwarded on, you may want to use a special contact address for this purpose, one you can change from time to time when the address starts receiving a lot of spam.
Setup of the mailing list for announcements or newsletters is now complete.
Adding Members to the List
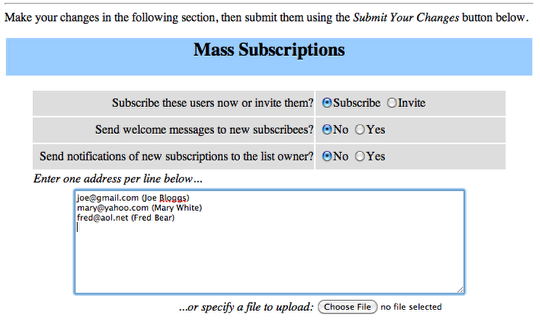
Members are added via the Membership Management… Mass Subscription page.
Add one address per line in the format:
j.smith@company.com (Jane Smith)
where the real name in brackets is optional. A large number of addresses can be added all at once by specifying a text file to upload, with addresses in the same format as above.
Note: adding members ‘silently’ without email confirmation can be carried out by setting Send welcome messages to new subscribees? to No. You may wish to do this if you are inputting addresses from a list where members have already been made aware they will receive emails from you.
Click Submit Your Changes at the bottom of the page to add the members.
A list of successful subscriptions will appear at the top of the page, as well as any applicants whose email address failed to be verified, or were already in the membership list.
How to Post to an Announce-Only List
Posting to the list is only possible for the list administrator and/or the list moderators. The email addresses used to post must either be in the membership list or added to the hold_these_nonmembers setting as outlined in the Setting Posting Authorisation step above.
In order to post, the first line of the message must have a special command in this format:
Approved: <password>
where <password> is the list administrator or list moderator password as appropriate. Ensure there is nothing (not even spaces!) after the password and before the next line, which should just be blank. The command line will be removed from the outgoing email to subscribers, so they will not see the password.
The administrator and moderator passwords can be changed from the Passwords link found in the top menu.
Credits
Much of the information in this guide is gleaned from the following websites:
- The Mailman Documentation Wiki, especially How do I create a newsletter, announcement, or one-way list?
- The GNU Mailman – List Administration Manual
- The GNU Mailman official website
and various articles around the web.